


Well, I thought I would do a little tutorial today that shows how to use a few of my favorite techniques on your layouts.

Here's my inspiration page I found in an old issue of Scrapbooks Etc. I love it's simplicity, and I thought it would be a perfect sketch to go off of for a layout with so much technique on it.

To start, gather some scraps and a piece of cardstock about 4"x4" in size.

Coat the cardstock with Mod Podge or any other medium, and then layer them over each other to make a base from which to cut your heart. Use a Heat Tool to speed up this process.

Once the base is dry, spritz it with your favorite spray. Now, not to be picky, but Tattered Angels spray doesn't work so well with this technique. You need a spray that is not so watery, like Smooch Spritz by Clearsnap or Color Wash by Ranger. These are a lot more saturated with color, and once dry, don't smear like Tattered Angels.
After you've spritzed your base, then use a white paint or ink to make some droplets. I used Liquitex Ink! but you can definitely use some watered down white acrylic paint.

Again, you can speed up the drying process with a heat tool, otherwise you'll have to let it dry all night.

Once that's dry, cut out a heart from the base and use some Liquitex Raw Umber Ink! to distress the edges.

Once that is finished, choose a couple of rubons to apply to the heart. I love these from Hambly that I got in one of Noel's past kits.

And these rubons from Basic Grey, in the Office Party kit. Oh YUM.

Then rub the edges with some silver Inka Gold from Viva Decor to get a nice, vintage look.

Run the heart through a sewing machine a couple times around the heart.

Then add some dots using a Black Pearl Pen, also from Viva Decor.

Once the pearl dots are dry, coat the whole thing with Mod Podge - I used this sparkle kind, and it's super cool!

Once that's dry, wrap some jute around the heart, securing it on the back with some masking tape.

You can tie whatever you want to the front of the heart, like a tag or key. Or both!

Now it's time to do the base of the layout. I didn't have the perfect color, so I mixed my Studio Classic Teal and Studio Blank Canvas together to get the right color. I mixed the paint right on my craft sheet - it's perfectly slick and works great!

Then I rolled my Inky Roller through the paint, and onto the page.

While the paint is drying, dap a teeny bit of Studio Black paint onto the craft sheet, spray with some Pearl Perfect Pearls Mists (water works too, but you don't get a pearl finish to the paint) and then get a good amount on a small paint brush.

Flick the paint brush over the page to get lots of splotches.
Then pick the rest of the elements for your page - photos, stickers, embellies, etc.
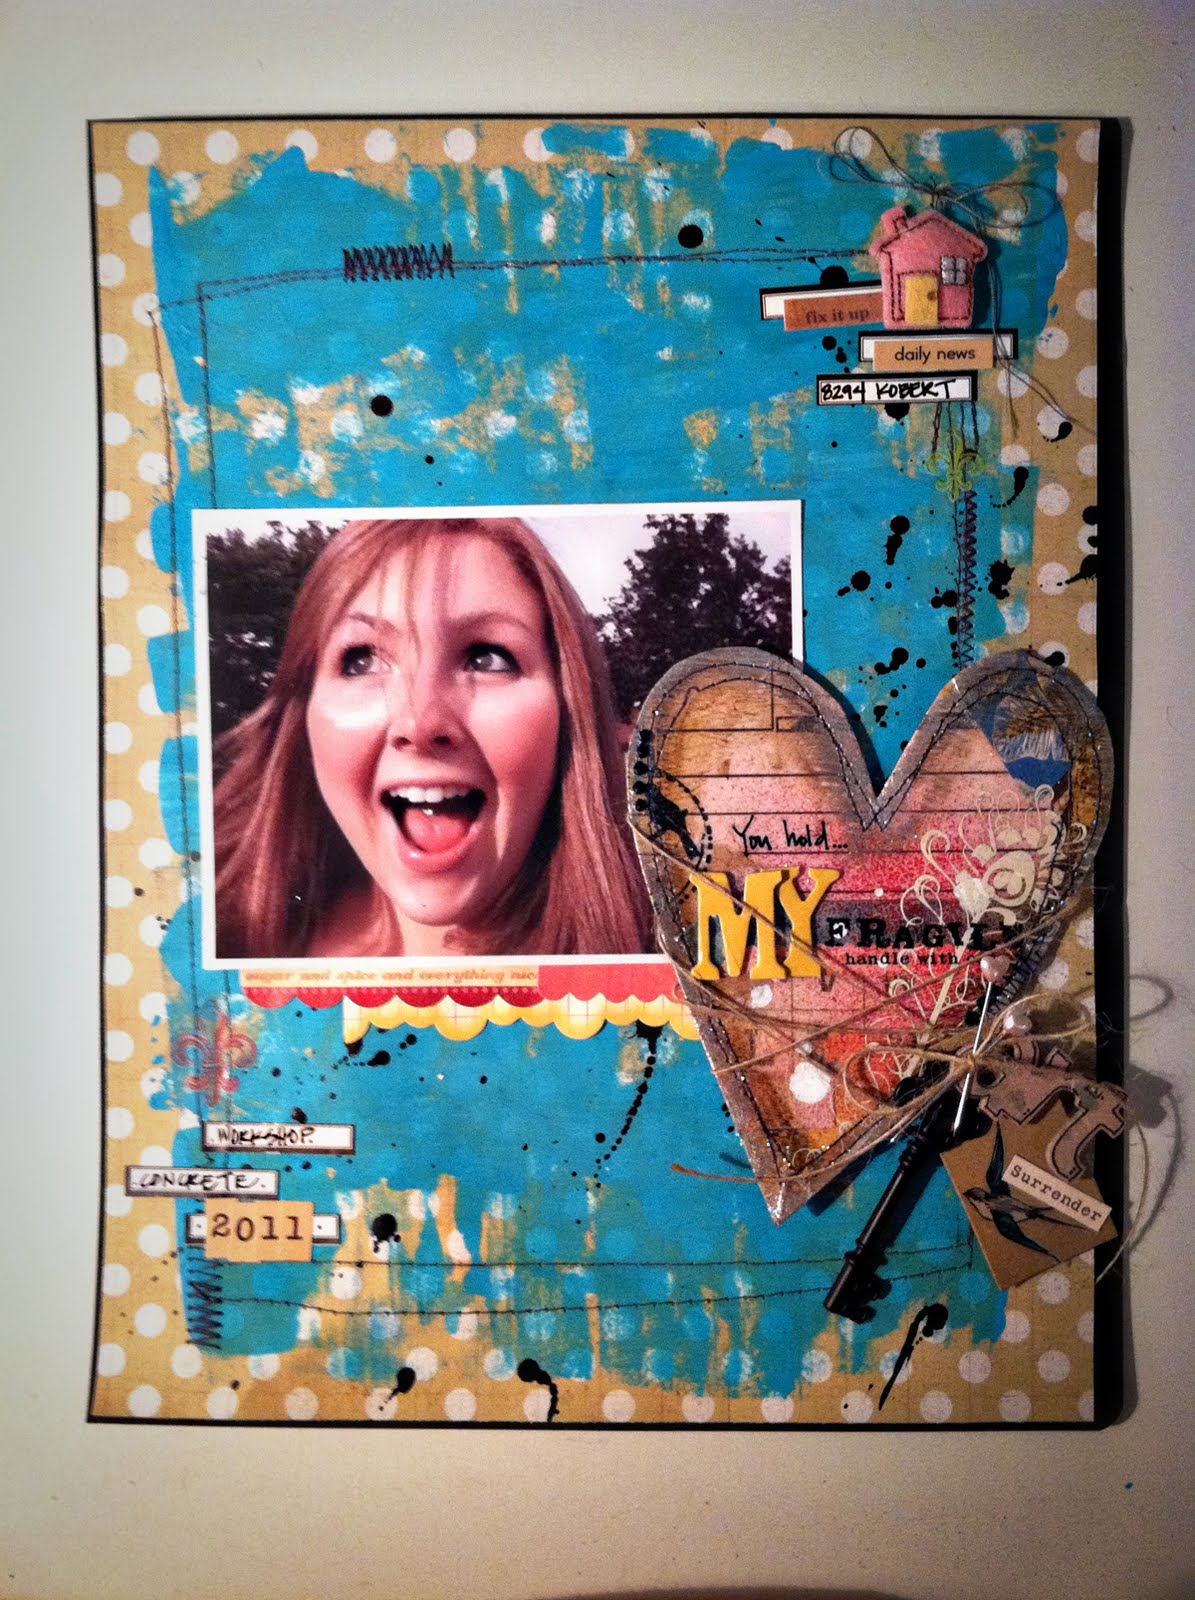
Here's my final product, and I looooove it! It's messy and loose and totally different than anything I've made before.

I just love that little felt house from the Delightfully Domestic kit. I HAD to have that on the page!
I also added some sloppy stitching around the inside of the page just to kind of anchor everything.

On my hear I added some Cosmo Cricket Alphas and some Maya Road heart pins, a metal key from who knows where, a spritzed up "art" chipboard from Maya Road, a snippet from a Cosmo paper, and a cute little clear birdie sticker from Hambly.
So that's it! Now go out and try something like this for yourself. Experiment. Make mistakes. Spill some paint. And for the love of God, get your fingers dirty!!
Any questions? Feel free to comment or email me at brittnykvilhaug@yahoo.com
Oh, and for those of you here for Freebie Friday, I decided to wait until next Friday, since I posted it late. I know. I'm a dweeb. But I still need lots of class ideas and advise, so this just gives you all a little more time to tell me what you want!
Happy Friday!!


8 comments:
Brit!! I love thiss!! I have never tried to use paints or sewing or even making a base out of a bunch of scraps and cutting out a shape.. I am totally inspired!! I love how the page looks so messy! I may have found my new obsession also. :) The heart came out perfect, I never would have though about putting so many different elements onto one piece but now I simply HAVE to try it!
You should definitely teach some kind of class. I love your mini albums with all of your distressing techniques and paper piecing and how they always come out so cute! I would most definitely be interested in taking a class by you :D
scrappinforkenzie.blogspot.com
{stop by sometime soon to see what I come up with using you as my inspiration!}
michelie510@hotmail.com
Britt, you never cease to amaze me!!! I LOVE every little detail. Mine won't look as cool as yours, but I have to give this a try!
Simply delightful creativity!! Love the abandonment and pure bliss that shows through this project!
Fabulous tutorial....fabulous heart....fabulous layout!! Loving all of the techniques/mediums you used!!
This is very cool, and I love that all this is already things I own. I have so many scraps and now I know how to use them. Great idea.
LOVE your page!
hugs,
sarah.
great tutorial ♥ it looks so much fun and the result is just so cool
Just adore this technique and what a great way to use up those scraps/leftovers!!!! Will try it this weekend and see how it goes!!!! Our godchild just finished visiting with us and we had made a visit to the build a bear store and those pics are just perfect for this technique!!
L-O-V-E your blog!!!!! I'll keep to a single request for nos... am interested in any dry embossing techniques you might have.
Post a Comment